
There are many ways to smoosh! You can use a silicone stamper, a sponge, or even crumpled plastic wrap. Presenting my favorite way to get the job done.
Products used:
✨ Base coat – Getting Even Primer by Mooncat
✨ Latex – Pueen Latex Tape
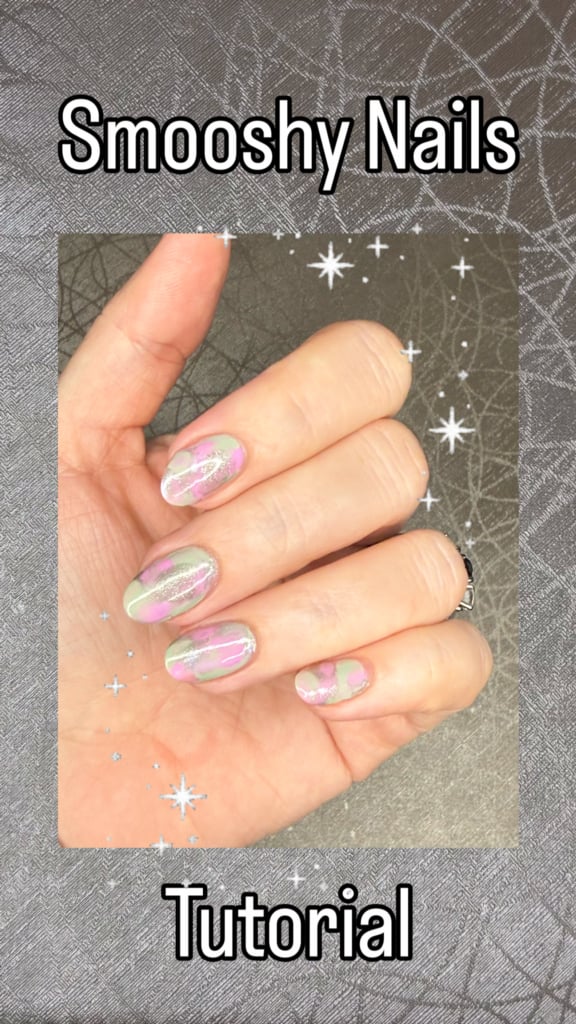
🌸 Midsummer’s Dream by @Mooncat
💗 The Little Mermaid by Miniso
🍬 Looking Fly for a Cacti by Sally Hansen
💚 Catch a Breeze by Lyn B Designs
✨ Top coat – Good to Go by Essie
The Game Plan –
Step 1: Cut several small squares (about 1×1 inch) from a Ziploc bag. Having these ready before you start is key!
Step 2: Apply your favorite base coat to protect your natural nails and help adhesion.
Step 3: Apply liquid latex or protective tape around your cuticles. This technique gets messy!
Step 4: Apply a thin layer of your lightest color to the nail. No need to let it dry fully.
Step 5: Add 3–5 dots of each color directly onto the nail.
✨ Tip on selecting your shades: Mix your finishes! Combine cremes with shimmers, holos, or glitters. Cremes provide a solid base while the sparkle adds dimension and texture to the marble.
Step 6: Smoosh! Gently press your plastic square down on the nail. Wiggle or tap it slightly to swirl the colors together, but don’t over-mix! A light touch is critical!
Step 7: Lift the plastic and run a toothpick around your cuticle line. This “breaks” the polish bridge for a crisp, clean edge.
Step 8: Remove your liquid latex and use a clean-up brush with a little acetone for the edges.
Step 9: Once the design has settled, apply a thick top coat to smooth out the surface for a glass-like finish.
If you smooshy tips or use a different method, let me know! I’ll put some troubleshooting tips in the comments as well. Enjoy!
by LearningLacquerista
1 Comment
🛑 Troubleshooting Tips 🛑
Avoid Bubbles by pressing from the center of the nail outward to push air to the edges.
If your marble looks muddy, you’re smooshing too much! A firm press and a tiny “shift” is all you need.
If you’re getting bald spots, wait 10–15 seconds before peeling. This lets the polish grip your nail better than the plastic.
You can use a silicone nail stamper instead of plastic if you want. Dot the colors onto the stamper head instead of your nail and “stamp” the design on. It’s a great backup plan, but does require cleaning the stamper often.